If you have purchased the optional Zetafax API module for Micronet, you can fax reports directly from Micronet. This option allows you to enter the fax address details.
Refer to "Options - Options".
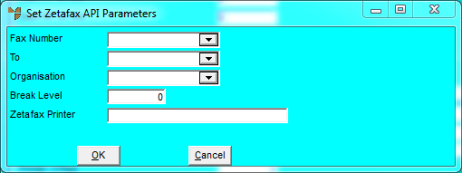
Micronet displays the Set Zetafax API Parameters screen.
|
|
Field |
Value |
|
|
Fax Number |
Select the Micronet field that holds the fax number the report is to be faxed to. |
|
|
To |
Select the Micronet field that holds the name of the person the report is to be faxed to. |
|
|
Organisation |
Select the Micronet field that holds the organisation the report is to be faxed to. |
|
|
Break Level |
Enter the break that causes a fax to a new customer to be generated. For purchase orders, the break level can be zero because each order goes to one supplier. For statements, the break level would usually be 1 because break 1 is on the debtor number and you want a new fax for each debtor. |
|
|
Zetafax Printer |
This is the default printer to print the report to. When installing the Zetafax API, it is important to install a printer called the Zetafax API Printer which you would install as an Epson LQ850 printer. Select LPT1 as the port. (Note that Micronet does not actually send to this port so it doesn't matter that the printer does not exist.) The API uses the driver to create a file which is then submitted to the Zetafax API. |
|
|

|
Technical Tip If you select one of the standard Zetafax Printers here, the fax will get generated, but the fax will have a reverse image. |
Micronet redisplays the Report Options screen.